While Katie has been making lots of wonderful, I have mostly been making a mess. My current living situation is changing. (No, I'm not moving. Yes, it does involve reorganizing an entire house. Oy.) And with our Thanksgiving extravaganza a mere 17 days away and in said house, I'm crunching to get the place acceptable. Of course, as I go I just keep seeing MORE things that need to be done. My life right now falls into that "wanna-be homemakers" category. (It really is being to feel like I'm transitioning from wanna-be to really being one.) So yes, I have nothing to show for last week because I certainly am not going to publish my mess! When it's all nice and clean and the boxes are more or less put away maybe then I can show what exactly I've been up too. Instead, today I give you this picture of a lovely, clean mid-century bedroom where I would like to go and hide until all the mess has been vamoosed.
Too bad I'm the one doing the vamoosing round these parts.
Oh and Happy Halloween!
(picture from a Sherwin-Williams mid-century style guide -- I downloaded it from a blog somewhere and I honestly can't remember where nor can I find it at the moment.)
Monday, October 31, 2011
Pick a project...
So today is Monday, and I have a post that's about creating!
Since J and I started this blog (only a few short weeks ago), I've discussed three major projects I've began (and to be honest, that I'm still in the middle of).
I've made some very good progress on all three of them so far, the first being my quilt.

When I last talked about my quilt, I had yet to even cut it out, let alone piece it together. Well, there it is, in all it's glory. I'm quite proud, but there was some difficulty in actually piecing that darn thing together. First of all, the original size I wanted wasn't exactly calculated right, so I had to make a quick design decision and came up with the layout shown. But what I didn't realize is just how hard it is to actually piece something together with the precision needed to make the symmetrical layout I had chosen.

After a few tries, it worked (for the most part, but I am slightly a perfectionist). Now I just need to actually quilt the darn thing, which I will be doing come family Thanksgiving time.
The second project I've made head-way with is my blanket. I've completed 62 circles (HOORAY!) and should be finishing the other 18 colored circles by Wednesday. Then it's just making 5 skeins of white circles, piecing it together, and adding the border... oh boy. That's a lot.

The third project is my dress. Oh my dress... I've spent roughly 8 hours on actually sewing it, and that's mainly because I have the lovely situation of not being an exact pattern size. It automatically makes things more complicated. I have a waist and hip size that fit pretty neatly into the 16 size range (although my hips are slightly bigger, my waist slightly smaller) but my bust is more like a size 14, which is screwy when it comes right down to it.

The pattern I chose included princess seams, which are generally great for someone of my build, wonderful even, except for my odd pattern size predicament. I've had to do lots of modifications, which aren't easy at all when it's just Carl and I in our little apartment with our two cats. My parents, grandfather, and sister all live in the same actual house as us (weird complicated situations, HOORAY!) but my parents both can't draw a stick figure to save their lives, my grandfather is 79 years old, and my sister is gone most of the time.... so I have to try and pin and adjust all by my lonesome. (Carl is fantastic as a husband, but he isn't super handy when it comes to the craft realm either.)

I also have the wonderful fact that this pattern is fully lined, meaning that I have to perfectly size my bodice piece to my size, then duplicate it in order to make the lining. Again, hooray.

But enough about that. I have added yet another project to my list, wonderful handkerchiefs. I found a stash and desperately want to embroider on them. But alas, my project list is enormous and I have less than 3 weeks to complete it... Sigh, better get back to the grindstone!
Since J and I started this blog (only a few short weeks ago), I've discussed three major projects I've began (and to be honest, that I'm still in the middle of).
I've made some very good progress on all three of them so far, the first being my quilt.

When I last talked about my quilt, I had yet to even cut it out, let alone piece it together. Well, there it is, in all it's glory. I'm quite proud, but there was some difficulty in actually piecing that darn thing together. First of all, the original size I wanted wasn't exactly calculated right, so I had to make a quick design decision and came up with the layout shown. But what I didn't realize is just how hard it is to actually piece something together with the precision needed to make the symmetrical layout I had chosen.

After a few tries, it worked (for the most part, but I am slightly a perfectionist). Now I just need to actually quilt the darn thing, which I will be doing come family Thanksgiving time.
The second project I've made head-way with is my blanket. I've completed 62 circles (HOORAY!) and should be finishing the other 18 colored circles by Wednesday. Then it's just making 5 skeins of white circles, piecing it together, and adding the border... oh boy. That's a lot.

The third project is my dress. Oh my dress... I've spent roughly 8 hours on actually sewing it, and that's mainly because I have the lovely situation of not being an exact pattern size. It automatically makes things more complicated. I have a waist and hip size that fit pretty neatly into the 16 size range (although my hips are slightly bigger, my waist slightly smaller) but my bust is more like a size 14, which is screwy when it comes right down to it.

The pattern I chose included princess seams, which are generally great for someone of my build, wonderful even, except for my odd pattern size predicament. I've had to do lots of modifications, which aren't easy at all when it's just Carl and I in our little apartment with our two cats. My parents, grandfather, and sister all live in the same actual house as us (weird complicated situations, HOORAY!) but my parents both can't draw a stick figure to save their lives, my grandfather is 79 years old, and my sister is gone most of the time.... so I have to try and pin and adjust all by my lonesome. (Carl is fantastic as a husband, but he isn't super handy when it comes to the craft realm either.)

I also have the wonderful fact that this pattern is fully lined, meaning that I have to perfectly size my bodice piece to my size, then duplicate it in order to make the lining. Again, hooray.

But enough about that. I have added yet another project to my list, wonderful handkerchiefs. I found a stash and desperately want to embroider on them. But alas, my project list is enormous and I have less than 3 weeks to complete it... Sigh, better get back to the grindstone!
Saturday, October 29, 2011
Canning, what's the worst that can happen?
Well, it's Saturday night, already, and I find my craft list growing, yet again.
Next weekend I'm going to be attempting to can for the first time and I have located 3 amazing recipes that I'm ready to try.
Cran-Raspberry Jam
Pumpkin Butter
Caramel Apple Jam
Now, these are all very fall recipes with our family Thanksgiving as mind (I like to give gifts, like a lot!) so I will be making half pints for roughly 5 people with these recipes. I'm going to be doing them up all pretty and J is going to be helping me make labels for them when I get to her house.
When it comes to canning, there are several things you need in order to even attempt canning at home.
They are:
Next weekend I'm going to be attempting to can for the first time and I have located 3 amazing recipes that I'm ready to try.
Cran-Raspberry Jam
Pumpkin Butter
Caramel Apple Jam
Now, these are all very fall recipes with our family Thanksgiving as mind (I like to give gifts, like a lot!) so I will be making half pints for roughly 5 people with these recipes. I'm going to be doing them up all pretty and J is going to be helping me make labels for them when I get to her house.
When it comes to canning, there are several things you need in order to even attempt canning at home.
They are:
A Jar Lifter
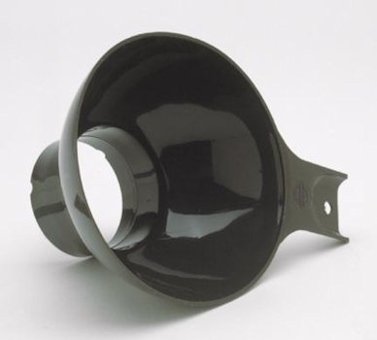
A Canning Funnel
An Enamel Pot (any pot will do)
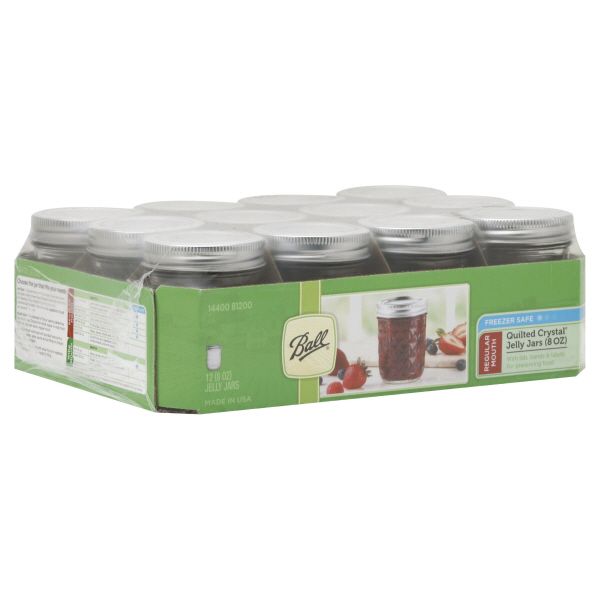
Mason Jars
(I tend to prefer Ball Jars, especially the quilted one because they feel more vintage in my mind!)
Now from everything I've read about canning, experimentation is amazing, which is great if you're a crafter but you need to remember the essentials, which means, generally you need pectin in order to jam, unless you're using a fruit that's high in pectin (such as apples). You also need to sterilize your jars before you use them! Or you could be canning bacteria in with your wonderful jam and that wouldn't be good for you or the jam! And lastly, you must boil your jars of jam for at least 5 minutes after filling in order to activate the vacuum seal.
There are honestly many great websites about canning with both instructions and recipes, so get our there and try. It's a great skill and an amazing way to home make gifts for the ones you love.
Thursday, October 27, 2011
Long Grey Days
Well yesterday was rainy and I was at a month long energy low -- plus I had nothing new about crochet (which may again be related to my massive lack of energy) and therefore you did not hear from me. I have been feeling a little under the weather and it's been very very grey here. So, I have been thinking about things that are comforting for those slow, grey days. You know the days, where bed sounds like the most brilliant invention ever and convincing yourself to put your feet on the floor is a monumental task.

Since today is supposed to be about thrift I think I'll mention my lovely bed first. I actually have TWO bedspreads that I have found at second-hand shops that I use on and off. Right now the bed is set up with a lovely 1960'sor 1970's chenille -- it is the cozy/wintery one. It's meant for a King-size bed so it is extra huge and hug-able. I purchased it a couple years ago for less than 5 dollars. It also is frequently featured as a backdrop. (see below) It's a little rough with some strands coming loose (I know there is a way to fix that I just haven't sat down to do it.) but it is pretty darn close to my favorite color and I had been on the lookout for a chenille bedspread for as long as I knew about them! Although it isn't exactly the right vintage I know they frequently used chenille in mid-century bedroom design so I think it will play nicely with all the 1950s furniture I hope to have someday.

Another second-hand treasure for those under the weather days -- how about some handkerchiefs? There was a while at my local thrift store where I could buy packs of them (8-10 hankies per pack) for about 65 cents. I'm sure they'll come around again but I haven't been finding any lately -- I probably bought up the whole bunch that belonged to one woman in the first place. I find that oddly comforting. I am trying to become accustomed to using them all of the time because it would be so much more economical and environmentally friendly. Weird how those two thing seem to coincide so frequently. Plus it's a great vintage affectation, yes? A little runny nose, pull out the hankie and BAM you are one classy dame. And these are lovely things that really should be used! It is somewhat difficult to convince myself that these lovely things are really intended for such an un-lovely use. (and to convince myself that they will, in fact, come clean in the wash.) I would like to convince the husband to use handkerchiefs too, although I would have to purchase more masculine ones. Then I could embroider his initials and he could have a vintage affectation. My desire to have him use them might have more to do with the fact that he is the largest consumer of tissues in our household.
And third, I thought I'd tack on something I'd really like to make for these grey days and the grey days to come. We have one of those store-bought microwavable heat packs -- you know with the beans or rice or whatnot in them and while it is super cozy, it is not all that attractive or soft. I knew you could make the things but Lo and Behold the glory of this tutorial. I hadn't thought of making it fuzzy! And rick rack, GASP! I'm seriously considering adding one of these to my "to make" list. In fact, I would add it straight away except I have already admitted that my "to make" list is waaaaaay out of control and needs to be pruned rather than expanded. Still those winter nights are coming and chris has to deal with some pretty frigid toes!

Since today is supposed to be about thrift I think I'll mention my lovely bed first. I actually have TWO bedspreads that I have found at second-hand shops that I use on and off. Right now the bed is set up with a lovely 1960'sor 1970's chenille -- it is the cozy/wintery one. It's meant for a King-size bed so it is extra huge and hug-able. I purchased it a couple years ago for less than 5 dollars. It also is frequently featured as a backdrop. (see below) It's a little rough with some strands coming loose (I know there is a way to fix that I just haven't sat down to do it.) but it is pretty darn close to my favorite color and I had been on the lookout for a chenille bedspread for as long as I knew about them! Although it isn't exactly the right vintage I know they frequently used chenille in mid-century bedroom design so I think it will play nicely with all the 1950s furniture I hope to have someday.

Another second-hand treasure for those under the weather days -- how about some handkerchiefs? There was a while at my local thrift store where I could buy packs of them (8-10 hankies per pack) for about 65 cents. I'm sure they'll come around again but I haven't been finding any lately -- I probably bought up the whole bunch that belonged to one woman in the first place. I find that oddly comforting. I am trying to become accustomed to using them all of the time because it would be so much more economical and environmentally friendly. Weird how those two thing seem to coincide so frequently. Plus it's a great vintage affectation, yes? A little runny nose, pull out the hankie and BAM you are one classy dame. And these are lovely things that really should be used! It is somewhat difficult to convince myself that these lovely things are really intended for such an un-lovely use. (and to convince myself that they will, in fact, come clean in the wash.) I would like to convince the husband to use handkerchiefs too, although I would have to purchase more masculine ones. Then I could embroider his initials and he could have a vintage affectation. My desire to have him use them might have more to do with the fact that he is the largest consumer of tissues in our household.
And third, I thought I'd tack on something I'd really like to make for these grey days and the grey days to come. We have one of those store-bought microwavable heat packs -- you know with the beans or rice or whatnot in them and while it is super cozy, it is not all that attractive or soft. I knew you could make the things but Lo and Behold the glory of this tutorial. I hadn't thought of making it fuzzy! And rick rack, GASP! I'm seriously considering adding one of these to my "to make" list. In fact, I would add it straight away except I have already admitted that my "to make" list is waaaaaay out of control and needs to be pruned rather than expanded. Still those winter nights are coming and chris has to deal with some pretty frigid toes!
Second hand sheets can be treasure, I promise
Hello all, Katie here. (J and I haven't quite figured out how to distinguish from each other in posts, so this greeting is a little bizarre.)
Well, it's Thursday, and that's a good thing because it's almost the weekend. It also means that a thrift store post is a must. I finally found out last weekend that my local DAV thrift store is in fact a treasure trove hidden away in my big (but really not so big) city. I was thrilled, and I managed to locate a pin and a pattern from the 60s for around $1.25, which is amazing.
I've found so many great thrift store finds, including those sheets I briefly mentioned last Thursday. I finally found an amazing use for them. Thanksgiving is quickly approaching and since a majority of my birth family either lives far away (my mom's side) or I don't see them much (my dad's side), J and I took it upon ourselves to make this year our first ever traditional family dinner. And because it is a first, for our family at least, we decided to make it a pretty formal affair. Now I'm not as great as J at locating amazing finds at thrift stores, so I decided (and then convinced J as well!) to make my first ever DRESS for this amazing affair. (You also must realize, our Thanksgiving is roughly 3 weeks away, and I'm starting tomorrow...)
So I located this pattern online and purchased it at my local fabric store for around $6. The dress is super cute, and looks something like this:
I needed to find some amazing fabric for this project, but I'm really bad at choosing fabric combinations for the most part and had been dying to use one of my sheets for something at some point. Hence, this project became the ideal option!

I only spent $0.45 on this sheet at a thrift store in J's hometown, which is super great. The more I thought about the project, the more I realized I didn't want the entire dress in this adorable yellow sheet, so I decided to just use it for the bodice. But I needed something great for the skirt that wouldn't break the bank.

I stumbled on this amazing suiting on sale for 50% off which meant I ended up spending around $15 for 3 1/2 yards! I know it's so geeky to get excited regarding coupons or sales at craft stores, but when you craft as much as J and I do, if you don't use coupons, you quickly go broke!

(You may also start to notice I use this tree a lot. It's the tree I got married under, and I'm quite fond of it, even if it's only half a tree due to lightning strikes!)
The pattern also called for a 14" zipper, 1 5/8" button, and I decided upon using bias tape to reinforce the seam between the skirt and bodice because the sheet isn't a super strong fabric and my suiting fabric was pushing into medium weight land. I already had generic white cotton I could use for a lining, so I was all set. All together, all the parts for this project ended up costing me $25 and my time, which I think is amazing. And this was only made possible by thrifting. You will never understand what you can find and make if you only go look at your local thrift store, seriously!
Yay, and happy Thursday!
Well, it's Thursday, and that's a good thing because it's almost the weekend. It also means that a thrift store post is a must. I finally found out last weekend that my local DAV thrift store is in fact a treasure trove hidden away in my big (but really not so big) city. I was thrilled, and I managed to locate a pin and a pattern from the 60s for around $1.25, which is amazing.
I've found so many great thrift store finds, including those sheets I briefly mentioned last Thursday. I finally found an amazing use for them. Thanksgiving is quickly approaching and since a majority of my birth family either lives far away (my mom's side) or I don't see them much (my dad's side), J and I took it upon ourselves to make this year our first ever traditional family dinner. And because it is a first, for our family at least, we decided to make it a pretty formal affair. Now I'm not as great as J at locating amazing finds at thrift stores, so I decided (and then convinced J as well!) to make my first ever DRESS for this amazing affair. (You also must realize, our Thanksgiving is roughly 3 weeks away, and I'm starting tomorrow...)
So I located this pattern online and purchased it at my local fabric store for around $6. The dress is super cute, and looks something like this:
I needed to find some amazing fabric for this project, but I'm really bad at choosing fabric combinations for the most part and had been dying to use one of my sheets for something at some point. Hence, this project became the ideal option!

I only spent $0.45 on this sheet at a thrift store in J's hometown, which is super great. The more I thought about the project, the more I realized I didn't want the entire dress in this adorable yellow sheet, so I decided to just use it for the bodice. But I needed something great for the skirt that wouldn't break the bank.

I stumbled on this amazing suiting on sale for 50% off which meant I ended up spending around $15 for 3 1/2 yards! I know it's so geeky to get excited regarding coupons or sales at craft stores, but when you craft as much as J and I do, if you don't use coupons, you quickly go broke!

(You may also start to notice I use this tree a lot. It's the tree I got married under, and I'm quite fond of it, even if it's only half a tree due to lightning strikes!)
The pattern also called for a 14" zipper, 1 5/8" button, and I decided upon using bias tape to reinforce the seam between the skirt and bodice because the sheet isn't a super strong fabric and my suiting fabric was pushing into medium weight land. I already had generic white cotton I could use for a lining, so I was all set. All together, all the parts for this project ended up costing me $25 and my time, which I think is amazing. And this was only made possible by thrifting. You will never understand what you can find and make if you only go look at your local thrift store, seriously!
Yay, and happy Thursday!
Wednesday, October 26, 2011
Chapeaux!
Hello all, another Wednesday, another crochet post, by yours truly (Katie!)
Since I started crocheting, I've completed several projects, and since I haven't made enough progress in my blanket to even give a new update regarding it, I will discuss my 2 most favorite projects I've completed for my hope chest.
J will tell you right away that we have a very distinct list for our hope chests. And I started out super great in following that list, but the more I looked on Ravelry, the more absolute adorable projects I discovered (including my blanket and a jumper I will discuss later on). And I kept telling myself, "Oh I will finish ____ project, then get back to my list" and I've definitely got completely sidetracked at this point. Yes, I have completed 1 sweater, 1 over night soaker, and a couple pairs of baby booties, but I've also made a scarf for myself, and a hat. But the proudest items I've completed for my hope chest are the two baby bonnets I've made.
The first I completed is a traditional style blessing day bonnet found here. I found that the project was simple but absolutely beautiful. I used NaturallyCaron Spa in misty taupe, which is one of the few yarns I use that is an acrylic blend, but I absolutely love how it came out:

The detail of the crown of this bonnet is adorable, and looks something like this:

The next bonnet I completed is called a pixie hat. It is adorable and is tied with a button around the neck. And there is a cute little point right at the top of the bonnet that makes your child look like a cute little wood nymph. I decided to make this project in Lion Brand Nature's Choice Organic Cotton in spice which is simple scrumptious yarn that is super soft to the touch. It also came out amazingly and I will definitely be using this pattern over and over again as my go to gift for friends.

I find that the more and more time I spend on my blanket (which is a project I still enjoy and am quite proud of), the more I want to make pretty simple things. Lately, I've been craving this project which I want to make to hold all my wonderful in progress crochet projects.
Hopefully by next week I will have great progress to show on my blanket. Until next time, have a great day!
Since I started crocheting, I've completed several projects, and since I haven't made enough progress in my blanket to even give a new update regarding it, I will discuss my 2 most favorite projects I've completed for my hope chest.
J will tell you right away that we have a very distinct list for our hope chests. And I started out super great in following that list, but the more I looked on Ravelry, the more absolute adorable projects I discovered (including my blanket and a jumper I will discuss later on). And I kept telling myself, "Oh I will finish ____ project, then get back to my list" and I've definitely got completely sidetracked at this point. Yes, I have completed 1 sweater, 1 over night soaker, and a couple pairs of baby booties, but I've also made a scarf for myself, and a hat. But the proudest items I've completed for my hope chest are the two baby bonnets I've made.
The first I completed is a traditional style blessing day bonnet found here. I found that the project was simple but absolutely beautiful. I used NaturallyCaron Spa in misty taupe, which is one of the few yarns I use that is an acrylic blend, but I absolutely love how it came out:

The detail of the crown of this bonnet is adorable, and looks something like this:

The next bonnet I completed is called a pixie hat. It is adorable and is tied with a button around the neck. And there is a cute little point right at the top of the bonnet that makes your child look like a cute little wood nymph. I decided to make this project in Lion Brand Nature's Choice Organic Cotton in spice which is simple scrumptious yarn that is super soft to the touch. It also came out amazingly and I will definitely be using this pattern over and over again as my go to gift for friends.

I find that the more and more time I spend on my blanket (which is a project I still enjoy and am quite proud of), the more I want to make pretty simple things. Lately, I've been craving this project which I want to make to hold all my wonderful in progress crochet projects.
Hopefully by next week I will have great progress to show on my blanket. Until next time, have a great day!
Monday, October 24, 2011
Autumn Blanket
Does the fall automatically make crafters want to make blankets of some sort? If Katie and I are any indication of the whole, I would have to say yes. I got it in my head a couple weeks ago that I just had to make a blanket using the backing piece for my quilt that I had decided against using. And I needed to to it right now. It was a rather neutral pale yellow flannel so where do you go from there? Chris picked out the nice plaid, I had wanted something in an interesting pattern but there wasn't a lot to be had at the local fabric store.

Even though it is for a baby hope chest I have a real aversion to "baby" colors. In the first place I have to strive for gender neutral -- but also because I have a really acute sense of color. (Chris and I have a theory that because I have really poor night vision my rods must be really weak and my cones are super strong to make up for it) I want the things I make to last longer than babyhood and I want my future children to be around colors I like rather than the ones that are socially prescribed. It's all silly anyhow -- did you know that pink was originally the boy's color and blue the girls. Red is a more active color and pink is just pale red, so it makes sense. It changed sometime in the early 20th century. Such arbitrary rules we live by!

And here is how I made it:
Cut two 40 x 40 inch squares (or whatever size blanket you want) from flannel. Sew flannel wrong sides together leaving small opening to turn. Turn and top-stitch close to edge.
Cut a very long piece of yarn (mine ended up being 3 separate pieces and I hid the knots -- so it is possible to do but if you can do it all in one go you wouldn't have to fuss with the hiding) and use a tapestry needle to blanket stitch around with approximately 1/4 inch between each stitch. (Mine was a little off because I followed the plaid pattern on my flannel.)
Yarn weight – Fingering
Hook used – E
R1: join, 3 sc in each blanket stitch all the way around, join and turn
R2: ch 2, sk 1 st 1 dc * 1 dc ch 2 1 dc sk 2 st repeat from * to end join and turn
R3: ch 2, 3 dc into ch 2 portion of previous row to end, join and fasten off
(Because my blanket stitch was a little off on two sides I did 4 dc instead of 3 dc into each ch 2 to get the edging to lay flat.)
and TADA! Easy lovely and cuddly.

Even though it is for a baby hope chest I have a real aversion to "baby" colors. In the first place I have to strive for gender neutral -- but also because I have a really acute sense of color. (Chris and I have a theory that because I have really poor night vision my rods must be really weak and my cones are super strong to make up for it) I want the things I make to last longer than babyhood and I want my future children to be around colors I like rather than the ones that are socially prescribed. It's all silly anyhow -- did you know that pink was originally the boy's color and blue the girls. Red is a more active color and pink is just pale red, so it makes sense. It changed sometime in the early 20th century. Such arbitrary rules we live by!

And here is how I made it:
Cut two 40 x 40 inch squares (or whatever size blanket you want) from flannel. Sew flannel wrong sides together leaving small opening to turn. Turn and top-stitch close to edge.
Cut a very long piece of yarn (mine ended up being 3 separate pieces and I hid the knots -- so it is possible to do but if you can do it all in one go you wouldn't have to fuss with the hiding) and use a tapestry needle to blanket stitch around with approximately 1/4 inch between each stitch. (Mine was a little off because I followed the plaid pattern on my flannel.)
Yarn weight – Fingering
Hook used – E
R1: join, 3 sc in each blanket stitch all the way around, join and turn
R2: ch 2, sk 1 st 1 dc * 1 dc ch 2 1 dc sk 2 st repeat from * to end join and turn
R3: ch 2, 3 dc into ch 2 portion of previous row to end, join and fasten off
(Because my blanket stitch was a little off on two sides I did 4 dc instead of 3 dc into each ch 2 to get the edging to lay flat.)
and TADA! Easy lovely and cuddly.
Poof is great, as long as you don't have to make it yourself...
J briefly mentioned the behemoth of a project we finished recently (bah, not so recently, but the memory is still burned into my brain).
Crinoline is an amazing invention. Gives shape and volume to skirts and dresses. I've always admired them, but not their price. They are super expensive and when J decided she wanted to make one, I thought it would be super easy, but boy, was I wrong.

Tulle is very cruel as a fabric. Like strip you naked, leave you in a field cruel. I've never really appreciated just how horrible of a fabric tulle is until we decided to spend an afternoon cutting and stitching together over 10 yards of tulle (and I'm pretty sure that was just one crinoline skirt, and we made 2... almost 2).
The pattern J got seemed easy enough. You simply get 10 yards of fabric, and cut out 8" wide strips of tulle, then use a serger to piece them all together. Sounds easy, right? Not so much.
After cutting out all of the pieces, which took both of us and lots of rulers and time getting angry, you have to serge the edges of them together and baste stitch all along 1 side of the 10+ yards so you can gather it all when you go to stitch it together.
By the last stitch (which also used the most amount of the tulle), I was ready to scream. J forced me to serge the stitch, even though this project was my first on a serger. Halfway through, after much frustration, I gave up. I gave up so much that I was done with the crinoline. I didn't care what happened to it. I was mad, so mad at that stupid tulle and everything involving it. Mad enough to walk away with the tulle still stuck in the serger. J was surprised, and amused by this prospect. She still hadn't done this stitch on her skirt, mind you.
So, in order to calm me down, she agreed to finish the stitch, since it was her serger we were using. And by the end of the stitch, she was just as mad at tulle as I was. And that's why her wonderful crinoline is sitting in a box, waiting to be finished.

Although it was much stress, and anger, my crinoline came out beautiful. I have yet to wear it, but it hangs on a nice hanger at my place, on display as my hardest project to be completed as of yet.
Crinoline is an amazing invention. Gives shape and volume to skirts and dresses. I've always admired them, but not their price. They are super expensive and when J decided she wanted to make one, I thought it would be super easy, but boy, was I wrong.

Tulle is very cruel as a fabric. Like strip you naked, leave you in a field cruel. I've never really appreciated just how horrible of a fabric tulle is until we decided to spend an afternoon cutting and stitching together over 10 yards of tulle (and I'm pretty sure that was just one crinoline skirt, and we made 2... almost 2).
The pattern J got seemed easy enough. You simply get 10 yards of fabric, and cut out 8" wide strips of tulle, then use a serger to piece them all together. Sounds easy, right? Not so much.
After cutting out all of the pieces, which took both of us and lots of rulers and time getting angry, you have to serge the edges of them together and baste stitch all along 1 side of the 10+ yards so you can gather it all when you go to stitch it together.
By the last stitch (which also used the most amount of the tulle), I was ready to scream. J forced me to serge the stitch, even though this project was my first on a serger. Halfway through, after much frustration, I gave up. I gave up so much that I was done with the crinoline. I didn't care what happened to it. I was mad, so mad at that stupid tulle and everything involving it. Mad enough to walk away with the tulle still stuck in the serger. J was surprised, and amused by this prospect. She still hadn't done this stitch on her skirt, mind you.
So, in order to calm me down, she agreed to finish the stitch, since it was her serger we were using. And by the end of the stitch, she was just as mad at tulle as I was. And that's why her wonderful crinoline is sitting in a box, waiting to be finished.

Although it was much stress, and anger, my crinoline came out beautiful. I have yet to wear it, but it hangs on a nice hanger at my place, on display as my hardest project to be completed as of yet.
Saturday, October 22, 2011
Quilting for the first time
So as far as crafts go, I've always been game for trying ANYTHING. So when J mentioned the idea of quilting I was game. We spent some time at the fabric store (we tend to buy fabric for crazy projects together, because J is amazing at coordinator colors) and located this amazing thing:

We spent some time perusing the aisles at our local fabric store to find some good mates for this wonderful cloth. It took a long time and was quite amusing as it was roughly a half hour before the fabric shop closed and J and I decided to commandeer an entire aisle in order to lay out our fabric (we also tend to do things that really embarrass our husbands in these situations). After searching and going through lots of options, we came down to these 4 fabrics:

I fell in love with these fabrics and couldn't wait to get started. I located a great batting material that doesn't contain polyester (which is also another important thing J and I strive for in our projects). The packaging looks like this:

So I was all game for starting as soon as possible. Then I got to realizing, cutting out fabric for patterns can be stressful, but it became more stressful to cut out squares and rectangles for a quilt I was going to be stitching together for my future child. I got nervous... and there that wonderful fabric sat, for almost 2 months.
Last night I got up the guts to cut out my pieces and I shall be starting to piece that wonderful quilt together tonight. It's another type of home craft that I've always wanted to try, but thought I never would. I'm excited for this project and will definitely post photos when I finish quilting it. (J and I are still nervous about the process of actually quilting, so we'll be doing it together come Thanksgiving).

We spent some time perusing the aisles at our local fabric store to find some good mates for this wonderful cloth. It took a long time and was quite amusing as it was roughly a half hour before the fabric shop closed and J and I decided to commandeer an entire aisle in order to lay out our fabric (we also tend to do things that really embarrass our husbands in these situations). After searching and going through lots of options, we came down to these 4 fabrics:

I fell in love with these fabrics and couldn't wait to get started. I located a great batting material that doesn't contain polyester (which is also another important thing J and I strive for in our projects). The packaging looks like this:

So I was all game for starting as soon as possible. Then I got to realizing, cutting out fabric for patterns can be stressful, but it became more stressful to cut out squares and rectangles for a quilt I was going to be stitching together for my future child. I got nervous... and there that wonderful fabric sat, for almost 2 months.
Last night I got up the guts to cut out my pieces and I shall be starting to piece that wonderful quilt together tonight. It's another type of home craft that I've always wanted to try, but thought I never would. I'm excited for this project and will definitely post photos when I finish quilting it. (J and I are still nervous about the process of actually quilting, so we'll be doing it together come Thanksgiving).
Survey Says!
1. Most recent project started:

Does today count?! I dragged the husband to the fabric shop, he was not amused. I am making a dress for our Thanksgiving celebration, which is a formal-ish affair. I guess I haven't really started, but I'm excited because I purchased all the materials today. (coupons hooray!) It's Simplicity 3673, which I had bought a while ago and filed in my stash. I'm going to try and do some interesting bead applique around the neckline, which is something new for me. (but I like that detail, fiddly kind of work) I haven't decided on a pattern for the bead work yet . . . I'll probably spend a couple hours ogling vintage cocktail gowns on the internet before I begin.
2. Project started the longest ago:

I'm quite ashamed to answer this one. . . It's the embroidery I have been working on to celebrate Katie's wedding -- so lets see -- it's a little over a year old. I bet I have worse ones than that but usually they fall into the category of "abandoned" rather than "unfinished." The satin stitch on this baby is what's killing me. I will finish it though, gosh darn it, before she comes for Thanksgiving!
3. Project that is scaring you the most right now:

Hmm I don't really know if I have one that is scaring me, but I do have one that I am super frustrated with. I'm making an infant soaker sac out of a scrumptious Paton's seafoam yarn but my round joins are so ugly -- I have not been able to find a tutorial that tells me what in the blazes I am doing wrong and have tried doing it as neatly as I thought humanly possible. I tore out about 1/3 of what I had done because it was unacceptable. I don't want to scrap the project because I really want the resulting garment for my hope chest -- so it's been at a standstill for quite some time.
4. Biggest craft failure (in the last year or so):

I think Katie is going to talk about this soon but as you can see mine is still sitting unfinished in a box. It only needs one more seam, but boy that seam is quite a doozy. It is supposed to be a crinoline using this vintage tutorial -- but tulle is a cruel cruel master. . .
5. Most recent project completed:

This blanket -- I think I'll talk about it soon so I won't bore you with the details twice. (I had fun photographing it. That's my grandmother's rocking chair set up in the ditch behind our house. I looked like a crazy person, knee deep in weeds with a camera.)
6. Craft you would most like to make but cannot:
THIS, oh this, a thousand times this! Alas, I don't think I have quite reached the skill level required yet. Katie tells me I should wait and usually she's all gung-ho about giant seemingly impossible projects. Also I took a look at the written pattern got dizzy, and felt like I was standing on the edge of a large canyon. (the kind of canyon that if you fall down and manage to survive there is no way to escape, etc.) So I think I had better just drool over it for a while and wait for my skills to catch up to my tastes. Bummer.
7. Most useful thing you've created:

I think it would have to be this wallet and checkbook cover -- I know, super boring, but you should have seen me trying to buy root beer and bok choy with the old slapdash mess of a method I had for storing my cards -- coins and old receipts and bits of paper and my lucky shamrock pin all tumbling out and the clerk waiting, just waiting. . . (It's this checkbook cover and this wallet) I've made a couple of these wallets as gifts and helped my sister and a friend make them for themselves as well.
8. How long is your craft "to do" list:
I'm super ashamed to say I really can't find the end of it. I have a list written up right now that takes up an entire page of yellow legal paper -- but I know for a fact if I were to go and wander around my craft room I would find several more projects that have been neglected or all-out forgotten. While it is insanely satisfying to be able to cross something off the list, in true impetuous form I much prefer the planning and starting.

Does today count?! I dragged the husband to the fabric shop, he was not amused. I am making a dress for our Thanksgiving celebration, which is a formal-ish affair. I guess I haven't really started, but I'm excited because I purchased all the materials today. (coupons hooray!) It's Simplicity 3673, which I had bought a while ago and filed in my stash. I'm going to try and do some interesting bead applique around the neckline, which is something new for me. (but I like that detail, fiddly kind of work) I haven't decided on a pattern for the bead work yet . . . I'll probably spend a couple hours ogling vintage cocktail gowns on the internet before I begin.
2. Project started the longest ago:

I'm quite ashamed to answer this one. . . It's the embroidery I have been working on to celebrate Katie's wedding -- so lets see -- it's a little over a year old. I bet I have worse ones than that but usually they fall into the category of "abandoned" rather than "unfinished." The satin stitch on this baby is what's killing me. I will finish it though, gosh darn it, before she comes for Thanksgiving!
3. Project that is scaring you the most right now:

Hmm I don't really know if I have one that is scaring me, but I do have one that I am super frustrated with. I'm making an infant soaker sac out of a scrumptious Paton's seafoam yarn but my round joins are so ugly -- I have not been able to find a tutorial that tells me what in the blazes I am doing wrong and have tried doing it as neatly as I thought humanly possible. I tore out about 1/3 of what I had done because it was unacceptable. I don't want to scrap the project because I really want the resulting garment for my hope chest -- so it's been at a standstill for quite some time.
4. Biggest craft failure (in the last year or so):

I think Katie is going to talk about this soon but as you can see mine is still sitting unfinished in a box. It only needs one more seam, but boy that seam is quite a doozy. It is supposed to be a crinoline using this vintage tutorial -- but tulle is a cruel cruel master. . .
5. Most recent project completed:

This blanket -- I think I'll talk about it soon so I won't bore you with the details twice. (I had fun photographing it. That's my grandmother's rocking chair set up in the ditch behind our house. I looked like a crazy person, knee deep in weeds with a camera.)
6. Craft you would most like to make but cannot:
THIS, oh this, a thousand times this! Alas, I don't think I have quite reached the skill level required yet. Katie tells me I should wait and usually she's all gung-ho about giant seemingly impossible projects. Also I took a look at the written pattern got dizzy, and felt like I was standing on the edge of a large canyon. (the kind of canyon that if you fall down and manage to survive there is no way to escape, etc.) So I think I had better just drool over it for a while and wait for my skills to catch up to my tastes. Bummer.
7. Most useful thing you've created:

I think it would have to be this wallet and checkbook cover -- I know, super boring, but you should have seen me trying to buy root beer and bok choy with the old slapdash mess of a method I had for storing my cards -- coins and old receipts and bits of paper and my lucky shamrock pin all tumbling out and the clerk waiting, just waiting. . . (It's this checkbook cover and this wallet) I've made a couple of these wallets as gifts and helped my sister and a friend make them for themselves as well.
8. How long is your craft "to do" list:
I'm super ashamed to say I really can't find the end of it. I have a list written up right now that takes up an entire page of yellow legal paper -- but I know for a fact if I were to go and wander around my craft room I would find several more projects that have been neglected or all-out forgotten. While it is insanely satisfying to be able to cross something off the list, in true impetuous form I much prefer the planning and starting.
Thursday, October 20, 2011
1st Anniversary

October 15, was our 1st wedding anniversary.
My husband's present to me was a second-hand china cabinet.

I fell in love with this cabinet at my favorite local thrift store -- I managed to pull myself away and pass it up the first week I saw it. But when I saw it was still there the next week I knew I had to have it. The price of this cabinet was certainly right but getting it home would be a real kerfuffle. We have managed to fit a lot of strange things into Chris's car --an exercise bike? sure! 6 chairs? why not! a giant fluffy recliner? game on! This time though we were kind of stumped -- so the husband made some calls. Lucky for me, chris's younger brother owns a large truck and his family was only lives just over an hour away and were willing to assist. So they visited, we chatted, and my china cabinet made its way home. (He says this gets him major husband points, he's racking them up to redeem something -- I'm not sure what.) A pretty good story and exactly the present I wanted.
Thrifty: trust me, it can be fun!
Hello there, Katie here.
As I previously stated, J and I try very hard to have almost everything we can homemade, although it's usually me that's pushing us towards trying before buying. I feel at this point, I must step back and explain WHY that is my immediate thought process. I was raised in a house with a very handy father who could fix almost anything (he's a plumber by trade, but he knows how to wire a light fixture, re-roof a house, change the transmission on a car, and even re-carpet our entire house) so right off the bat I had an affinity for doing things myself. When I was a young-en, I used to take apart almost every mechanical thing in my house and put it back together (it almost always worked still...almost). As I got into high school, I found I wasn't entirely terrible at using power tools, and found extreme satisfaction at creating something with my own two hands. Anything I could.
In comes me at 20 years of age, deciding I was going to go to art school. I didn't know what I wanted to do as an artist, but I knew I needed to create. After a few years of bumbling around (and discovering I can dye fabric, carve wood, make jewelry, and fiddle with photography) I discovered I wasn't a terrible printmaker. It was in this printmaking class I fully discovered J! We realized we were kindred spirits and our need for anything homemade came into fruition. As we got to know each other, we learned our tastes were very similar, and as you know we became the bestest of friends (more like family).
Then we decided upon creating a hope chest. We try very hard to make almost everything for our hope chests with our own two hands, but sometimes there are things you just can't make, no matter how much you want to. And with this statement, I finally come to the reason for my post today:
SECOND HAND STORES!
Second hand stores are amazingly wonderful things. You can find almost anything you need at second hand stores (and sometimes things you didn't think you'd need!) for wayyy cheaper that you could ever find them in (x) store. I've found some amazing pieces that I realized I just couldn't live without.
As I previously stated, J and I try very hard to have almost everything we can homemade, although it's usually me that's pushing us towards trying before buying. I feel at this point, I must step back and explain WHY that is my immediate thought process. I was raised in a house with a very handy father who could fix almost anything (he's a plumber by trade, but he knows how to wire a light fixture, re-roof a house, change the transmission on a car, and even re-carpet our entire house) so right off the bat I had an affinity for doing things myself. When I was a young-en, I used to take apart almost every mechanical thing in my house and put it back together (it almost always worked still...almost). As I got into high school, I found I wasn't entirely terrible at using power tools, and found extreme satisfaction at creating something with my own two hands. Anything I could.
In comes me at 20 years of age, deciding I was going to go to art school. I didn't know what I wanted to do as an artist, but I knew I needed to create. After a few years of bumbling around (and discovering I can dye fabric, carve wood, make jewelry, and fiddle with photography) I discovered I wasn't a terrible printmaker. It was in this printmaking class I fully discovered J! We realized we were kindred spirits and our need for anything homemade came into fruition. As we got to know each other, we learned our tastes were very similar, and as you know we became the bestest of friends (more like family).
Then we decided upon creating a hope chest. We try very hard to make almost everything for our hope chests with our own two hands, but sometimes there are things you just can't make, no matter how much you want to. And with this statement, I finally come to the reason for my post today:
SECOND HAND STORES!
Second hand stores are amazingly wonderful things. You can find almost anything you need at second hand stores (and sometimes things you didn't think you'd need!) for wayyy cheaper that you could ever find them in (x) store. I've found some amazing pieces that I realized I just couldn't live without.
I came across this wonderful suitcase and 2 sheets for under $3! I plan on creating things out of the sheets but this just goes to show you that you can find amazing things if you know where to look.
More often than not, the things you'll come across will be TERRIBLE but you just have to realize you sometimes have to wade through the crap to find the treasure underneath. Usually the things I buy are of better quality than most of the items I would find for 10x the price in brand stores. I would much rather pay $5 for something that's needs a little love and tlc than something that I have to pay $100 and is made of particle board.
So please, if you just can't find something in your price range that you truly want, don't rule out second hand stores!
Wednesday, October 19, 2011
Jumping in feet first... and over the cliff
Hello all, Katie here.
To give a little more background information, I learned to crochet roughly 2 months ago, thanks to J's wonderful instruction after seeing her do a few projects. I jumped in feet first, by every meaning of the phrase, and started out with a sweater roughly sized for a 12 month old. (I should also clarify, I tend to this in almost every project I do, sometimes to much dismay from both J, and my husband, Carl).
After successfully completing several projects that were small, and pretty simple, I got progressively more brave in my attempts and convinced myself I wanted to crochet a blanket. But instead of being smart and crocheting something small, I decided I was going to potentially kill myself with a 5 ft. x 6 ft. (plus a little extra) quilt like blanket.
I've made pretty good progress on it, considering I've spent roughly 2 weeks of time and energy, and have maybe a third of it. It's quite a simple little pattern, located here:
http://www.ravelry.com/patterns/library/sunny-spread
It's wonderfully beautiful, and I'll be very happy when I complete it, but here's where I stand:
I need 120 "squares", and am fully completed with roughly 38, so I've made a good dent, but I have a long way to go.
(You'll notice almost all of these do not have their white borders around them yet, so they aren't technically squares).
Also, feel free to check out my ravelry page to see new projects I'm working on, as well as previous projects I've finished: http://www.ravelry.com/people/twoofakind
babbles, buttons, and baby sweaters
I learned to crochet originally in high school -- but I was abysmal at it. I made about 1/3 of a blanket in purple acrylic ombre in the tightest single crochet I think I have ever seen. Needless to say it was awful looking, the result was stiffer than anyone could feasibly use, and crocheting that tight made my hands hurt.
After several other stops and starts I picked it up again this year. I think I get it now. . .you know all those numbers for the weights of the thread and the fiber content and the various stitch patterns. . . I can't tell you how many times I looked up the corresponding word name for the number of weight on my husband's phone. Now it's a little mental song, 1 fingering (4-ply), 2 sport (5-ply), 3 double knit (8-ply), 4 worsted (10-ply). Somehow, this time, it seems to be sticking in the crevices of my brain matter in a usable and hopefully permanent way. I know there is more to it than that and much much more to learn -- oh believe me I know.
Well anyway -- Katie and I made a master list for our baby hope chests. We have plenty of time to make lots of things, so we were trying to decide exactly what to make. Of course, I would much rather make the adorable things over the truly practical things (like little sweaters rather than diaper soakers).
This is the first sweater I made. It's the "hooded jacket with frog closure" from the the book Simple Crochet for Cherished Babies, which I checked out from the library. (I love the library, first thing we did when we moved back here was to get library cards. . .oh we are lame.) I modified it slightly by adding a button placket -- which I had never done before. I just looked at another sweater in the same book that was button-up and went from there.
This particular sweater is made in 6 rectangular pieces -- it's a lot of seaming but creating the rectangles is so easy that it balances that out for me. Plus, this sweater is so stinkin' cute, even without a squirming adorable little bean inside. If you want more technical information (yarn type, sizes, etc) you can check out my Ravelry page. And even if you don't want to know about this particular project you should check out Ravelry! They have so many amazing free patterns for both knit and crochet and tons of pictures of projects to ogle as well.
This is the second sweater I made -- exactly the same only one size up and in a different color. Please take note of the caterpillar on the sweater, I think all sweaters should be christened with small adorable fuzzy things crawling on them when at all possible.
I'd also like to take a moment to talk about buttons and my official button chooser. When I finish any project that requires a button -- no matter how girly -- I drag my poor husband, Chris, to the fabric store. I march him up and down the aisle until he picks me some buttons. It is an excruciating process, that usually takes well over ten minutes. He is the official button picker. I should make him a badge or a sash or something. Let's appreciate the thoughtful selection of buttons on both sweaters with a moment of mental cheering. (He would pick wood buttons for every sweater if he could. I retain some modicum of veto power.)
While crocheting the second sweater, I started to realize the entire thing was done in V-stitch and that potentially I could make the same garment using a more interesting stitch. (maybe that's a duh moment, but I seriously felt like a genius at the time.) So I have begun yet another sweater -- one more size up, in another color, with another stitch pattern. The stitch pattern I'm using for the front panels is called "blackberry salad." I checked out another book from the library that demonstrates lots of stitch types and tried about 20 of them before I finally decided. I think for the back, the sleeves and the hood I'm going to do in simple double crochet. The bobbles might be uncomfortable to lay on and babies sure spend a lot of time laying.
Maybe you are wondering why I keep making the same pattern? I know I have been wondering that. But when I stop to think about it, I really like the vintage lines of the pattern. (the hood is pointed!) The sleeves roll up --which I hope will give it longer wear potential, I don't have a baby so I don't know for sure. I also like it because it is crocheted in fingering (number 1, 4-ply!), which makes it look a lot more delicate than most crochet and is a light weight sweater which will be better for layering. ( I don't know when this baby will be born, I have no idea how big they will be in each season.) And finally repeating the same pattern seems to be a good way to get me to learn -- it bores me into really thinking about what is coming together to make the garment and how I can replicate it in my own way.
After several other stops and starts I picked it up again this year. I think I get it now. . .you know all those numbers for the weights of the thread and the fiber content and the various stitch patterns. . . I can't tell you how many times I looked up the corresponding word name for the number of weight on my husband's phone. Now it's a little mental song, 1 fingering (4-ply), 2 sport (5-ply), 3 double knit (8-ply), 4 worsted (10-ply). Somehow, this time, it seems to be sticking in the crevices of my brain matter in a usable and hopefully permanent way. I know there is more to it than that and much much more to learn -- oh believe me I know.
Well anyway -- Katie and I made a master list for our baby hope chests. We have plenty of time to make lots of things, so we were trying to decide exactly what to make. Of course, I would much rather make the adorable things over the truly practical things (like little sweaters rather than diaper soakers).
This is the first sweater I made. It's the "hooded jacket with frog closure" from the the book Simple Crochet for Cherished Babies, which I checked out from the library. (I love the library, first thing we did when we moved back here was to get library cards. . .oh we are lame.) I modified it slightly by adding a button placket -- which I had never done before. I just looked at another sweater in the same book that was button-up and went from there.
This particular sweater is made in 6 rectangular pieces -- it's a lot of seaming but creating the rectangles is so easy that it balances that out for me. Plus, this sweater is so stinkin' cute, even without a squirming adorable little bean inside. If you want more technical information (yarn type, sizes, etc) you can check out my Ravelry page. And even if you don't want to know about this particular project you should check out Ravelry! They have so many amazing free patterns for both knit and crochet and tons of pictures of projects to ogle as well.
This is the second sweater I made -- exactly the same only one size up and in a different color. Please take note of the caterpillar on the sweater, I think all sweaters should be christened with small adorable fuzzy things crawling on them when at all possible.
I'd also like to take a moment to talk about buttons and my official button chooser. When I finish any project that requires a button -- no matter how girly -- I drag my poor husband, Chris, to the fabric store. I march him up and down the aisle until he picks me some buttons. It is an excruciating process, that usually takes well over ten minutes. He is the official button picker. I should make him a badge or a sash or something. Let's appreciate the thoughtful selection of buttons on both sweaters with a moment of mental cheering. (He would pick wood buttons for every sweater if he could. I retain some modicum of veto power.)
While crocheting the second sweater, I started to realize the entire thing was done in V-stitch and that potentially I could make the same garment using a more interesting stitch. (maybe that's a duh moment, but I seriously felt like a genius at the time.) So I have begun yet another sweater -- one more size up, in another color, with another stitch pattern. The stitch pattern I'm using for the front panels is called "blackberry salad." I checked out another book from the library that demonstrates lots of stitch types and tried about 20 of them before I finally decided. I think for the back, the sleeves and the hood I'm going to do in simple double crochet. The bobbles might be uncomfortable to lay on and babies sure spend a lot of time laying.
Maybe you are wondering why I keep making the same pattern? I know I have been wondering that. But when I stop to think about it, I really like the vintage lines of the pattern. (the hood is pointed!) The sleeves roll up --which I hope will give it longer wear potential, I don't have a baby so I don't know for sure. I also like it because it is crocheted in fingering (number 1, 4-ply!), which makes it look a lot more delicate than most crochet and is a light weight sweater which will be better for layering. ( I don't know when this baby will be born, I have no idea how big they will be in each season.) And finally repeating the same pattern seems to be a good way to get me to learn -- it bores me into really thinking about what is coming together to make the garment and how I can replicate it in my own way.
Tuesday, October 18, 2011
We figure introductions might be in order --
There are the two of us here, and I'm J. (Nice to meet you.) Me and my cohort, Katie, both graduated from art school and married our respective husbands last year -- a giant shift in life that I am still trying to figure out. Ultimately "the plan" is to move our two families together onto a farm. (a plan met with much enthusiasm by all.) To prepare, Katie and I try to learn how to make things -- lots of things. I will try any kind of craft I come upon and Katie is usually game as well. I would like to keep track of our crafty endeavors, for posterity and reference, and figured this was as good a way as any since we live 175 miles apart.
Hello, I'm Katie. I'm the one of us who tends to push for the fine arts that I know we can achieve, as well as the home crafts. As J said, we are into almost every kind of crafting and home arts, as well as fine art projects. We are printmakers by trade in the fine arts world but we are also avid crocheters and seamstresses (of sorts) whenever we get free time. We are not only into traditional fabric crafts, but I've recently decided to take up canning. J and I both have a vintage obsession and I think that's why our crafty obsession has lead us to start this blog. We don't traditionally shy away from any project and I have a tendency to say “Oh, I can do that” with regards to almost everything I see.
I for one hope that with this blog we will learn from our mistakes, chronicle our achievements, and maybe inspire a few crafty hopefuls out there.
Hello, I'm Katie. I'm the one of us who tends to push for the fine arts that I know we can achieve, as well as the home crafts. As J said, we are into almost every kind of crafting and home arts, as well as fine art projects. We are printmakers by trade in the fine arts world but we are also avid crocheters and seamstresses (of sorts) whenever we get free time. We are not only into traditional fabric crafts, but I've recently decided to take up canning. J and I both have a vintage obsession and I think that's why our crafty obsession has lead us to start this blog. We don't traditionally shy away from any project and I have a tendency to say “Oh, I can do that” with regards to almost everything I see.
I for one hope that with this blog we will learn from our mistakes, chronicle our achievements, and maybe inspire a few crafty hopefuls out there.
Subscribe to:
Posts (Atom)